Položite trup

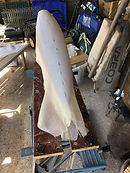
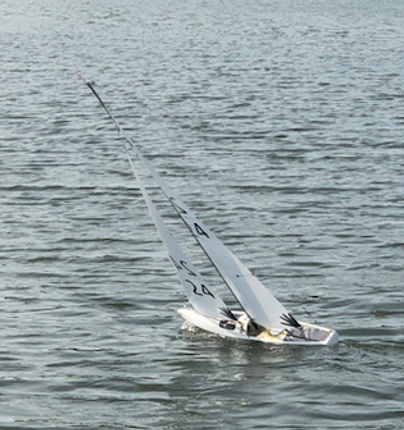
S voštanim čepom bio sam spreman za izgradnju broda. Krajnji rezultat nakon bojenja temeljnim premazom visoke čvrstoće i puno brušenja prikazan je na fotografiji. Ovaj je spreman za opremanje.
Kliknite na bilo koju sliku da biste je proširili.
Build the hull on the male mould
What you need
Glass cloth. 2*135gm E cloth and 1x124gm S cloth.
Slow cure epoxy East Coast fibreglass
2 pack high build epoxy primer. SML Paints
Roller
Paint brush
Mixing pots
Safety glasses
The process
Making the hull and components
My first question was what layup to use. Looking at the boat builder sites, I guessed my layup would provide a strong but not too heavy boat however I tried a few layups on a test mould to see what I would get. In the end I used 2*135gm E cloth and 1x124gm S cloth. I am going to build a new boat and use 3 layers of 124gm S cloth which is stronger and will use less epoxy.
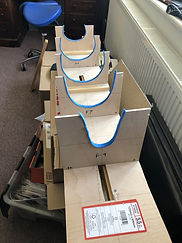
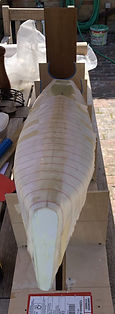
At the same time as laying up the hull, I made the hull components using the same layup. I needed a mould for the deck area just aft of the foredeck. The picture shows the mould under construction prior to rubbing smooth.

Components for the bow, stern and bulkhead, simply a glass and epoxy sheet laid on a flat board covered in packaging tape which is a great release agent. For the rudder and servo supports, I laid glass over strip wood wrapped in packaging tape to create a light rigid beam to bond across the boat.

The hull is laid up in the same way as the plug. Pre cut the cloth and mark a centreline on the hull and the cloth. Allow for an overlap of 1 inch on the foredeck.

I used West systems slow cure epoxy resin which in the Summer gave me about half an hours work time. Stop work when the epoxy starts to go stringy and clean your tools with Acetone before mixing a fresh pot of epoxy.
I use Nitril gloves which I wash in acetone to remove any sticky epoxy. I also use a full face filter mask although this is not needed. Unlike Polyurethane, epoxy does not smell too bad
To begin the layup, paint the hull with epoxy.
Add the first layer of E cloth and saturate the glass with epoxy using the aluminium roller. Take your time and make sure you get rid of all air bubbles. I worked on the hull first and then turned the mould over to work on the deck. Allow a 1 inch overlap on the deck and cut any excess cloth away with scissors. Keep a jar of acetone handy to keep the scissors clean.
I added more epoxy over the first layer of E cloth prior to adding the second layer. Roll out and finish as per the first layer. Repeat for the final layer of S cloth
Wrap the finished hull tightly in Peel ply.
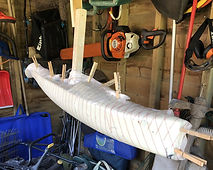
When I built the hull in about 75 degrees, I had to mix a second lot of epoxy for the final layer of S cloth as the first lot started curing.
Once hardened, remove the peel ply, then add 2 coats of high build epoxy primer. Like the plug the hull will look a mess but will look great once sanded.
Sand the hull so you can see through to glass but do not cut any fibres. This will make the hull as light as possible and ready for a top coat of 2 pack polythene which is done after fit out. Fix any faults/holes as necessary.
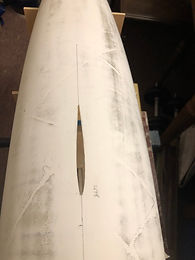
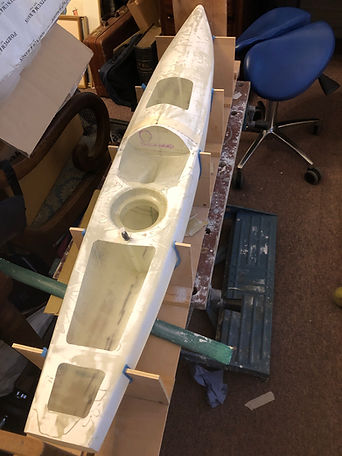
Once happy with hull finish cut through the centreline of the the foredeck and stern deck. Brad suggested a knife but I used a fine cutter on a Dremel. Prise the hull off the mould. This process was much easier than I thought it would be. The whole structure is flexible so once off the mould so put in a jig to keep the designed shape.


Završite glavnu palubu
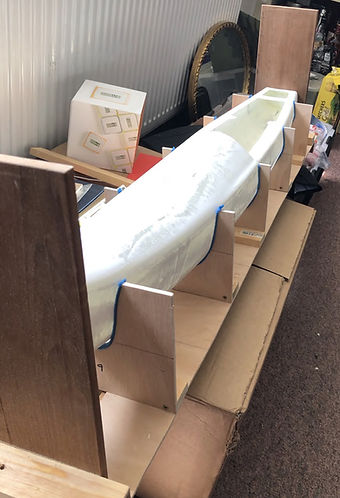
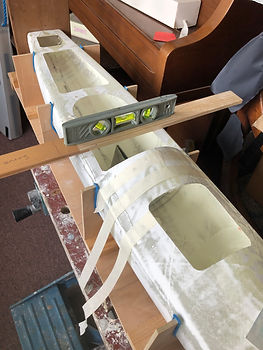
Čim trup siđe s kalupa ubacite ga ravno u šablon za podupiranje trupa. Izrezao sam okvire u šperploči koristeći planove i pričvrstio ih na jaku ravnu ploču. Ubod će se koristiti za poravnavanje peraje i kormila
Kliknite na bilo koju sliku da biste je proširili.
Bond the foredeck and stern deck
What you need
-
5 minute epoxy
-
Slow cure epoxy
-
Bent piece of wire as long as the foredeck
-
1" glass tape
-
Bow and stern plates
The process
Tape the the top of the previously cut foredeck and stern together with masking tape prior to bonding below.
Sand the underside of the foredeck to provide a key for the 1"tape you are about to apply
Bond the underneath of cut foredeck and stern deck with 1" fibreglass tape.

Allow to cure and remove the masking tape. I put the glass tape underneath the deck and on top but I think you only need to bond underneath and fill the gap on top.
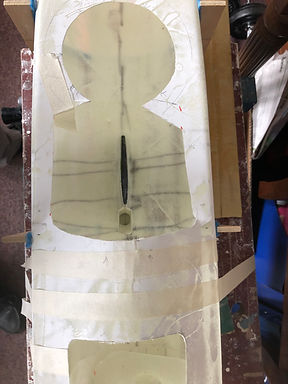
To get the tape all the way up the foredeck, wet the tape with epoxy and roll up. Using the wire with a 1" bend at the end, to support the roll and unroll it right (with the hull upside down) to the end of the foredeck. Once unrolled it should sit flat and use the wire to move the tape if necessary. See image 4.
Remember to put some peel ply over the top of the tape on top of the deck. Image 6. (This was probably an unnecessary step as I think the tape only needs to go on the underside.)
The foredeck will be very strong because you will have 6 layers of glass including the overlay and the 1" tape. Slightly over engineered I think.
Repeat the process on the stern deck. I had to put a plate across the stern and the next bridge as I had not finished the original layup properly. Image 8 and 9.


Having taped on top of the foredeck I had to re apply 2 coats of high build epoxy and sand down. There is no need to do this if you bond underneath the deck only.
I fitted 2 perpendicular end plates onto the jig so I could shape the bow and stern on the hull to be, one, vertical and two, at 90 degrees to the centre line of the boat. Image 10

Trim the bow and stern plate and fit with 5 min epoxy. Spot glue in place initially and then seal and fillet with epoxy and micro balloons.
Spojite prednju palubu i krmenu palubu
Što trebaš
5 -minutni epoksid
Epoksid s polaganim stvrdnjavanjem
Savijeni komad žice dugačak koliko i prednja paluba
1 "staklena traka
Pramčane i krmene ploče
Postupak
Zalijepite vrh prethodno izrezanog prednjeg dijela i krme zajedno s maskirnom trakom prije lijepljenja ispod. Pogledajte sliku 5.
Ošmirglajte donju stranu prednje palube kako biste dobili ključ za 1 "traku koju namjeravate nanijeti
Spojite ispod izrezane prednje palube i krmene palube 1 "trakom od stakloplastike. Slika 4. Pustite da se stvrdne i uklonite ljepljivu traku. Stavio sam staklenu traku ispod palube i na vrh, ali mislim da se samo trebate spojiti ispod i popuniti prazninu na vrhu.
Da biste traku skroz podigli prema prednjoj strani, namočite traku epoksidom i smotajte. Koristeći žicu s zavojem od 1 "na kraju, možete podupirati rolu i odmotati je desno (s trupom naopako) do kraja prednje palube. Kad se odmota, trebao bi sjediti ravno i po potrebi žicom pomicati traku. Pogledajte sliku 4.
Ne zaboravite staviti malo ljuske na vrh trake na vrhu palube. Slika 6. (Ovo je vjerojatno bio nepotreban korak jer mislim da traka mora ići samo s donje strane.)
Prednja paluba bit će vrlo jaka jer ćete imati 6 slojeva stakla uključujući prekrivač i traku od 1 ". Malo pretjerano projektirano.
Ponovite postupak na krmenoj palubi. Morao sam staviti ploču preko krme i sljedećeg mosta jer nisam pravilno završio izvorni raspored. Slika 8 i 9.
Nakon što sam zalijepio vrh prednje palube, morao sam ponovno nanijeti 2 sloja epoksida visoke čvrstoće i obrusiti. Nema potrebe za tim ako se vežete samo ispod palube.
Postavio sam 2 okomite završne ploče na šablon tako da mogu oblikovati pramac i krmu na trupu, jednu, okomitu i dvije, pod 90 stupnjeva prema središnjoj liniji broda. Slika 10
Odrežite pramčanu i krmenu ploču i nanesite 5 min epoksidom. U početku nanesite ljepilo na mjesto, a zatim zatvorite i punite epoksidnim i mikro balonima. Slika 8 prikazuje početno uklapanje.
Na kraju uklonite višak palube kako bi rupe bile vidljive prema planu. Pogledajte slike 7 i 8.
Na slici 5 samo je krmena paluba na mjestu. Na sljedećem brodu dovršit ću palubu do utičnice.
Sad dolazi što mislim da je najteži dio procesa izgradnje. Obilježava gore i izrezivanje rupe u trupu za peraje i lijepljenje u poravnato kućište peraje te ga lijepljenjem na palubu i naprijed pregradom. Kad napravim svoj sljedeći brod, dodat ću slike položaja peraje.
Kliknite na bilo koju sliku da biste je proširili.
The fin case, bulkhead and forward aft deck
What you need
-
5 minute epoxy
-
Slow cure epoxy
-
Fin
-
Fin case
-
Rudder
-
Rudder stock brass tubes
-
Cross bars for rudder stock and rudder servo mount.
-
Prepared forward part of the aft deck
-
Cut out bulkhead shape to fit under fordeck
-
1"glass tape
-
Various fittings, jib tack bolts, mast ram, mainsheet post, back stay bolt, mainsheet pulley blocks, fairleads to allow the endless mainsheet to go through bulkhead
The Details
Tape the hull into the jig so the shroud points on the deck are parallel to the base of the jig. Everything will be aligned to this.
Measuring from the stern datum, mark the front and back of the fin hole on the outside of the hull. Then mark a centreline which you will have marked on the frames of the jig. This will get the correct alignment for the fin hole. Remove the hull and using the fin, mark the contour of the fin. Cut out the slot for the fin using a Dremel or similar being careful to cut well inside the line. Use sandpaper to open the slot to fit the fin exactly.
Tape the hull back in the jig. With the fin in the slot, push the fin case over the fin so that the bottom of the case is lying on the hull.
There are two measurements on the plan to align the fin, one shows the tip of the fin where is enters the bulb. This should be 330mm from the bottom of the hull and the other measures from the same fin tip to the bottom of the bow of the boat. If set up correctly the leading edge of the fin should be perpendicular to the waterline. Shape the bottom of the fin box and fin until this is achieved. Ideally the fin should fit all the way into the fin box.
I used some string to determined the position of the tip of the fin.

Reinforce the shroud bolt locations with half an inch of 1" tape and once dry fit the shrouds.
There is a huge amount of strength with this design in this area and no further reinforcement is needed.
Fit the shroud bolt now while you have access to the underside of the deck.
Once the base of the fin box is shaped and the fin aligned, now is the time to dry fit the forward part of the aft deck and trim the top of the fin box until the deck fits snuggly. Spot glue the fin box in place with the fin in the box and support in the right position.

Once fixed seal the fin box to the hull with 5 min epoxy and microballoons with a small fillet. Finally reinforce the fin box to the hull with 1"glass tape and epoxy.

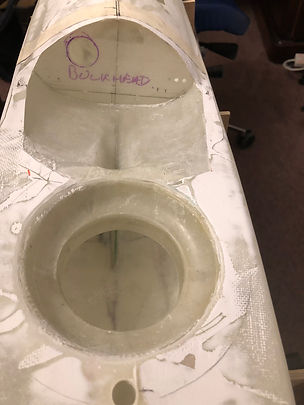
With the fin box in place, dry fit the forward part of the deck with the fin box and forward bulkhead.
Once happy with fit, do a final check that the forward bulkhead is in the right place from the stern datum. Get this wrong and you will have issues with your mast ram. Spot glue with 5 min epoxy and micro balloon. With 5 min epoxy and micro balloon seal the bulkhead and seal where the fin box connects with the deck. Finally reinforce the top of the fin box with fin one inch tape.

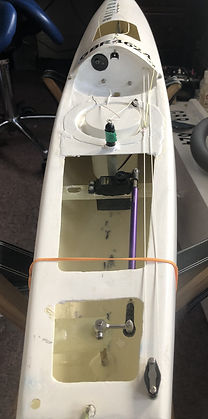
Finally glue the radio pot holder under the deck and seal with epoxy. In my first build I glued the pot on top which looks messy.

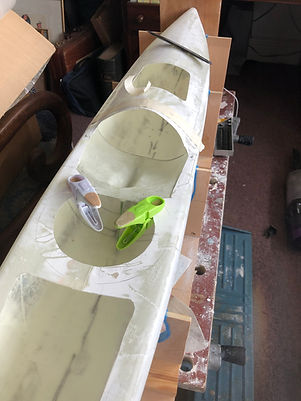
Bond in the cross beams for the servo and rudder stock with one inch tape See image below for positions. Remember to sand the inside of the hull to create a good keyed surface.
Drill the hole in the deck for the fin bolt and mast. Now is the time to check for leaks. Fill the depressed area of the deck forward of the radio pot with water and see if there are any leaks.
Drill a 4mm hole in the hull for the rudder, with the central point located from the jig and distance from the aft datum measured off the plan.
The rudder stock is 2 tubes of brass, one 5mm o/d and one 4mm o/d. The two tubes slot into one another and the rudder post goes inside for a very tight fit.
Mark on the rudder brace bar a line which when a hole is drilled for the stock ensures the trailing edge of the rudder does not extend beyond the stern of the boat. The rudder stock will project a couple of mm above the cross bar. Drill a hole in the centre and ream it wide perpendicular to the hull. Fit the stock in place on the rudder and in the boat. Apply some 5 min epoxy with micro balloon to fix the top of the stock with the rudder exactly aligned with the keel. Leave to set, then seal the stock in the hull and reinforce the top if necessary. The worst is over. My first cross beam was so strong I saved weight by cutting it in half. The next cross beam will be much lighter.
Paint the whole boat in 2 pack polyurethane top coat and lightly rub and t-cut to desired finish


Fit the mainsheet post, backstay bolt, aft pulley for mainsheet, fairleads for sheet control through the bulkhead, setting these as low as possible so they don't interfere with the kicker on a run on port gybe. Fit the 4 jib sheet leads in the foredeck and the 3 tack bolts. Finally, drill a bung hole, push a needle through the centre of the bung, thread a chord and tie to the backstay.

Drill two bolts to hold the winch bracket in the forward bulkhead. Align the winch with the fairleads.
The bracket was just a 90 degree moulding cut to shape around the winch and enough flange to brace it securely to the bulkhead.

Drill a hole for the mast ram and fit.
Bond a strengthening post in the foredeck around the jib tack area to stop foredeck lifting under load.

Don't fit the radio pot until correctors have been fitted.
Posljednji montažni posao na brodu
Što trebaš
Ruka kormila za kormilo
Priključak od kormila do serva
Servo
Prijamnik
Baterija LiFeP04 baterija 1600mA (više od punog dana trajanja). Mogli biste koristiti čak 900 mA ako trebate uštedjeti na težini.
Vodootporni prekidač za uključivanje/isključivanje
RG vitlo i nosač.
Postupak
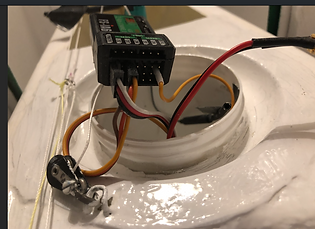
Izbušite rupu u prednjoj pregradi s lijeve strane za električni prekidač za uključivanje/isključivanje i postavite je.
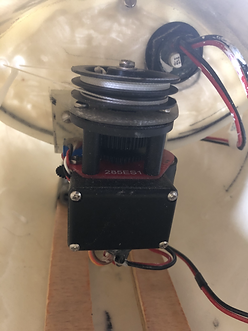
Montirajte vitlo na potporni nosač i labavo pričvrstite na pregradu.
Napravite rupu u poprečnom nosaču za servo i postavite kabel do radio utora.
Napravite rupu na vrhu lonca za radio odmah ispod potpornog okvira i provucite servo i kabel za bateriju u unutrašnjost posude kroz otvor.
Spojite servo upravljača na kanal 1 na prijemniku.
Spojite konektor vitla na kanal 3 i pričvrstite treći labavi kabel vitla na suvišni središnji pin, recimo kanal 5.
Spojite prekidač na vitlo. Koristite konektore XT30 gdje je to moguće ili ste dobili dovoljno snage za vitlo.
Ako uključite napajanje, uz malo sreće, uključeni odašiljač pomaknut će kormilo i vitlo.
Postoji cijeli odjeljak o postavljanju radijskog odašiljača OVDJE .
Ako sve radi, spremni ste za postavljanje beskonačnog podešivača listova.
Beskrajni list je mukotrpan posao. Kupio sam vitlo s povratnom remenicom sa samonatezanjem, tj. Opremljeno je oprugom koja će spriječiti opuštanje linije lima.
Pronađite krajnje točke vitla pomicanjem upravljačke palice na odašiljaču do kraja gore i dolje. Koristim up za list do kraja i dolje za potpuno unutra.
Napustiti upravljačka palica prema dolje (list unutra). Uzmite dva retka i provucite kroz pregrade za pregrade i trčite do vitla. Vanjska linija uvlači listove, a unutarnja pušta list. Donja remenica na vitlu je uvučena, gornja opružna remenica je izvađena. Vanjskom linijom zavežite donju remenicu i 5 puta je omotajte. Vežite unutarnju liniju za gornju remenicu, ali koristite samo jedan i a pola okreta. Lagano zategnute niti kako ne biste izgubili omote na vitlu, sada možete sigurno montirati vitlo.
Vanjska linija vodi se duž palube i kroz stražnju remenicu blizu stražnjeg dijela sa desne strane, navojena prema unutra i zatim vezana za 5 mm nehrđajući prsten 2 "od bloka remenice. Unutarnja linija (list van) može se zategnuti, osjetit ćete otpor samonatezne remenice i vezati se za nehrđajući prsten tako da je beskonačni sustav razumno čvrst. Glavni i potporni listovi vezati će se za prsten. Beskonačni sustav glavne ploče je dovršen.


If you turn the power on, with any luck a switched on transmitter will move the rudder and winch.
There is a whole section on the setup of the radio transmitter HERE.
If all works you are ready to fit the endless sheet adjuster.
The endless sheet is a fiddly job. I bought the winch with a self tensioning return pulley, i.e it is fitted with a spring that will stop the sheet line going slack.
Find the end points of the winch by moving the control stick on the transmitter fully up and down. I use up for sheet fully out and down for fully in.
Leave the control stick down (sheet in). Take two lines and thread through the bulkhead fairleads and run to the winch. The outer line will pull the sheets in and the inner will let the sheet out. On the winch the bottom pulley is sheet in, the top sprung pulley is sheet out. With the outer line, tie off on the lower pulley and wrap 5 times round the pulley. Tie the inner line to the upper pulley but only use one and a half turns. Keeping the lines lightly tensioned so you don't lose wraps on the winch, you can now securely mount the winch.
The outer line is run along the deck and through the aft pulley near the backstay on the starboard side, threaded out to in and then tied to a 5mm stainless ring 2" from the pulley block. The inside line (sheet out) can be tensioned, you will feel the resistance of the self tensioning pulley and tie off to the stainless ring so the endless system is reasonable tight. The main and jib sheets will tie off to the ring. The endless mainsheet system is complete.


Krajnji rezultat
Next Section